Paint-Your-Own (PYO) cookies are a fun and creative treat that combines art and deliciousness. Perfect for parties, they allow everyone to unleash their inner artist while enjoying a tasty masterpiece.
What Are Paint-Your-Own (PYO) Cookies?
Paint-Your-Own (PYO) cookies are a delightful and interactive treat that combines creativity with deliciousness. These cookies are specifically designed as edible canvases, allowing individuals to paint and personalize their own designs. Typically made from sugar cookie dough, PYO cookies are baked, cooled, and then coated with a base layer of royal icing. Food coloring is used to create vibrant paints, which are applied using small brushes. This concept is perfect for both kids and adults, offering a fun and artistic way to enjoy a sweet treat. PYO cookies are ideal for parties, holidays, or as a creative activity at home, making them a popular choice for those who love hands-on experiences and personalized desserts.
Why PYO Cookies Are Perfect for Parties and Events
Paint-Your-Own cookies are an excellent choice for parties and events due to their interactive nature, allowing guests to express their creativity while enjoying a tasty treat. They serve as both an engaging activity and a personalized party favor, making them memorable and fun. The ability to customize designs with vibrant colors and themes adds an extra layer of enjoyment, especially for themed events. PYO cookies foster social interaction, acting as a great icebreaker and keeping guests entertained. Additionally, they offer a cost-effective entertainment option that doubles as a takeaway, making them a versatile and delightful addition to any gathering. Their adaptability and appeal to both kids and adults ensure a positive experience for everyone involved.
Materials Needed for Painting Cookies
Essential materials include cookie dough, royal icing, food coloring, small paintbrushes, stencils, and edible paint palettes or store-bought kits for a seamless creative experience.
Essential Tools: Brushes, Palettes, and Stencils
Small, flat paintbrushes are ideal for detailing and filling large areas, while round brushes work best for intricate designs. Palettes, either homemade or store-bought, organize edible paints neatly. Stencils provide guidance for consistent designs, especially for themed cookies like holidays or birthdays. These tools ensure a smooth and enjoyable painting experience, allowing both kids and adults to create vibrant, personalized cookies effortlessly.

Necessary Ingredients: Cookie Dough, Royal Icing, and Food Coloring
The foundation of PYO cookies begins with simple yet essential ingredients: sugar cookie dough, royal icing, and food coloring. Sugar cookie dough is baked into the cookie canvases, while royal icing serves as both a base and a medium for painting. Food coloring transforms the icing into vibrant edible paints; Additional ingredients like meringue powder, confectioner’s sugar, and vanilla extract enhance the icing’s consistency and flavor. These components are readily available in most grocery stores, making it easy to create a customizable and deliciously artistic treat for any occasion.

Preparing the Cookies for Painting
Bake cookies until golden, let them cool completely. Spread a thin layer of royal icing and allow it to set for a smooth painting surface.
Baking and Cooling the Cookies
Baking is the first step in preparing your cookies for painting. Preheat your oven to the temperature specified in your cookie dough recipe. Roll out the dough to your desired thickness and cut into shapes using cookie cutters. Place the cookies on a baking sheet lined with parchment paper, leaving space between each to prevent spreading. Bake until the edges are lightly golden, then remove from the oven and let cool on the baking sheet for a few minutes. Transfer the cookies to a wire rack to cool completely. Cooling is crucial as it ensures the cookies are firm and ready for icing. Allow at least 30 minutes to an hour for the cookies to cool thoroughly before moving on to the next step. Proper cooling prevents the icing from melting or becoming too runny when applied. Once cooled, your cookies are ready for their base layer of royal icing, creating a smooth canvas for painting. This step is essential for achieving professional-looking results and ensuring the paint adheres evenly. Always handle cooled cookies gently to avoid breaking, as they can be delicate. A well-baked and cooled cookie provides the perfect foundation for your creative painting session. Whether you’re hosting a party or a family activity, properly prepared cookies will make the painting process enjoyable and stress-free. Cooling also helps in maintaining the cookie’s shape and texture, making them easier to handle and paint. Remember, patience is key—rushing the cooling process can lead to a messy outcome. Once your cookies are completely cool, they are ready to be transformed into edible masterpieces with your artistic touch. This step sets the stage for the fun and creative painting process, allowing everyone to enjoy their personalized treats. Cooling is a simple yet vital step that ensures your cookies are in the best condition for painting. Take your time and let the cookies cool naturally—avoiding shortcuts here will result in better overall results. With properly cooled cookies, you can confidently move forward with the icing and painting steps, knowing your base is stable and ready for decoration. Cooling is the cornerstone of a successful paint-your-own cookie experience, so don’t skip or rush this important part of the process. Your patience will pay off when you see the final, beautifully painted cookies. Proper cooling ensures that the cookies are sturdy enough to handle without breaking and provides a smooth surface for the icing to adhere to. This makes the painting process much easier and more enjoyable for everyone involved. Cooling also helps prevent the cookies from becoming too soft or fragile, which could lead to unintended breaks during handling. By allowing the cookies to cool completely, you ensure that they retain their shape and are ready for the next steps in the painting process. This step is especially important if you’re planning a cookie painting party, as it ensures that each cookie is in the best possible condition for your guests to paint. Cooling is a straightforward process that requires minimal effort but yields significant benefits in the quality of your final product. Always prioritize proper cooling to achieve the best results for your paint-your-own cookie activity. The time invested in cooling will be well worth it when you see the beautiful, professional-looking cookies that everyone will enjoy. This essential step is the foundation of a successful and enjoyable cookie painting experience, making it well worth the wait. Cooling your cookies thoroughly ensures that they are stable, durable, and ready to be transformed into delicious works of art. Patience during this step will result in a more enjoyable and creative painting process for all participants. Properly cooled cookies are less likely to break and provide a better surface for painting, making the entire experience more rewarding. Cooling is a critical part of the cookie preparation process that should not be overlooked, as it directly impacts the quality of the final product. By following this step carefully, you can ensure that your cookies are in the best condition for painting and that everyone involved has a positive experience. The cooling process may seem time-consuming, but it is a necessary part of creating beautiful and durable paint-your-own cookies. Your attention to this detail will make a significant difference in the overall success of your cookie painting activity. Cooling is the unsung hero of the cookie preparation process, ensuring that your cookies are strong, stable, and ready for their artistic transformation. Without proper cooling, the entire painting process could be compromised, leading to a less enjoyable experience. Therefore, it’s important to allocate sufficient time for cooling to guarantee the best possible outcome for your paint-your-own cookies. Cooling is an essential step that sets the stage for a fun and successful cookie painting session. By allowing your cookies to cool completely, you ensure that they are in the ideal condition for painting, making the experience enjoyable for everyone. This simple yet crucial step is the key to achieving beautifully painted cookies that are both delicious and visually appealing. Cooling may seem like a passive step, but it plays an active role in the success of your paint-your-own cookie project. It ensures that the cookies are firm, stable, and ready to be transformed into edible art. Rushing this step can lead to a variety of issues, from broken cookies to uneven icing, which can detract from the overall experience. By taking the time to cool your cookies properly, you can avoid these potential pitfalls and ensure that your cookie painting activity is a success. Cooling is a vital part of the cookie preparation process that should not be rushed or overlooked. It ensures that the cookies are in the best possible condition for painting, leading to a more enjoyable and productive experience for all participants. The cooling process may require patience, but the end result is well worth the wait. Properly cooled cookies are essential for achieving professional-looking results and ensuring that the painting process goes smoothly. By prioritizing cooling, you can create a foundation for success in your paint-your-own cookie activity. Cooling is an often-underestimated step in the cookie preparation process, but it is crucial for achieving the best possible outcome. It ensures that the cookies are stable, durable, and ready for painting, making the entire experience more enjoyable. By allowing your cookies to cool completely, you set the stage for a fun and creative painting session that everyone will cherish. This step is the cornerstone of a successful paint-your-own cookie experience, providing the necessary foundation for beautiful and delicious results. Cooling is a simple yet important part of the process that should not be skipped or rushed. It ensures that your cookies are in the best condition for painting, leading to a more enjoyable and rewarding experience for all. By taking the time to cool your cookies properly, you can ensure that your paint-your-own cookie activity is a success and that everyone involved has a great time creating their own edible masterpieces. Cooling is the first step toward creating beautiful and delicious paint-your-own cookies, and it’s essential to get it right. By following this step carefully, you can ensure that your cookies are ready for the next stage of the process and that the final results are nothing short of amazing. The cooling process may seem tedious, but it is a necessary part of achieving the best possible outcome for your paint-your-own cookies. By prioritizing cooling, you can create a strong foundation for your creative endeavors and ensure that the painting process is both fun and successful. Cooling is a critical step that sets the stage for a enjoyable and productive cookie painting experience. It ensures that the cookies are in the ideal condition for painting, making the entire process more rewarding for everyone involved; By allowing your cookies to cool completely, you can avoid common pitfalls and ensure that your paint-your-own cookie activity is a resounding success. The cooling process is a small price to pay for the joy and satisfaction of creating your own edible works of art. It ensures that the cookies are stable, durable, and ready for painting, making the entire experience more enjoyable and stress-free. By taking the time to cool your cookies properly, you can ensure that your paint-your-own cookie project turns out beautifully and that everyone involved has a wonderful time. Cooling is an essential part of the cookie preparation process that should not be overlooked. It ensures that the cookies are in the best possible condition for painting, leading to a more enjoyable and successful experience for all. By prioritizing cooling, you can create a foundation for success and ensure that your paint-your-own cookies are everything you hoped they would be. The cooling process may require patience, but it is a crucial step in achieving professional-looking results. It ensures that the cookies are firm, stable, and ready for their artistic transformation, making the painting process much easier and more enjoyable. By allowing your cookies to cool completely, you can avoid common issues and ensure that your paint-your-own cookie activity is a hit with everyone involved. Cooling is the key to unlocking a successful and enjoyable cookie painting experience. It ensures that the cookies are in the ideal condition for painting, leading to beautiful and delicious results. By taking the time to cool your cookies properly, you can create a fun and memorable experience for all participants
Applying Royal Icing as the Base
Applying royal icing as the base is a crucial step before painting. Start by outlining the cookie with a border of 15-20 second icing, then flood the entire surface with the same consistency. Use a spatula or offset spatula to spread evenly, ensuring full coverage. Allow the base layer to dry completely, which can take 4-6 hours or overnight. This step creates a smooth, stable surface for painting. The royal icing acts as a canvas, ensuring the paint adheres evenly and vibrant colors pop. Properly dried icing prevents smudging and ensures long-lasting results. This base layer is essential for achieving professional-looking cookies. Letting it dry thoroughly guarantees a crisp, clean finish, ready for your artistic touches. The base icing is the foundation that brings your painted masterpiece to life;
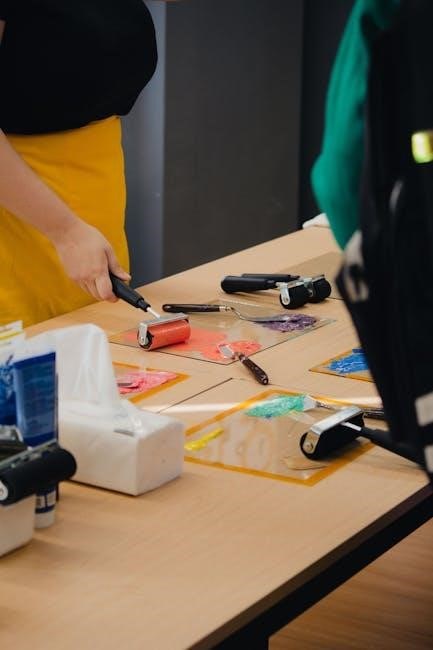
Setting Up the Paint Palette
Setting up the paint palette involves organizing edible colors and tools for easy access. Use store-bought kits or create custom palettes with food coloring and royal icing.
Creating Edible Paint Palettes
Creating edible paint palettes is a fun and customizable step in the PYO cookie process. Start by mixing small amounts of royal icing with food coloring in separate bowls. Use a few drops of high-quality food coloring to achieve vibrant hues. For consistency, add a small amount of vanilla extract to the icing mixture. Experiment with color combinations to create a unique palette. Once mixed, transfer the colors to a clean, food-safe surface or reusable palette. Allow the icing to set slightly before use. This method ensures the paints are durable and ready for artistic expression on your cookies. Organize your palette with small brushes and paper towels for easy cleanup.
Using Store-Bought Paint Kits
Store-bought paint kits are a convenient and mess-free option for painting cookies. These kits typically include pre-made edible paints, brushes, and sometimes stencils. Popular options like the Cookie Countess Paint Palette offer vibrant, food-safe colors that are easy to apply. Simply dip the brush into the desired color and paint directly onto the cookie. Many kits are designed for durability, ensuring the colors stay bright and intact. This method is ideal for parties or events, as it eliminates the need for mixing icing and coloring. Store-bought kits are a time-saving solution that still allows for creativity and fun, making them perfect for both beginners and experienced cookie painters.
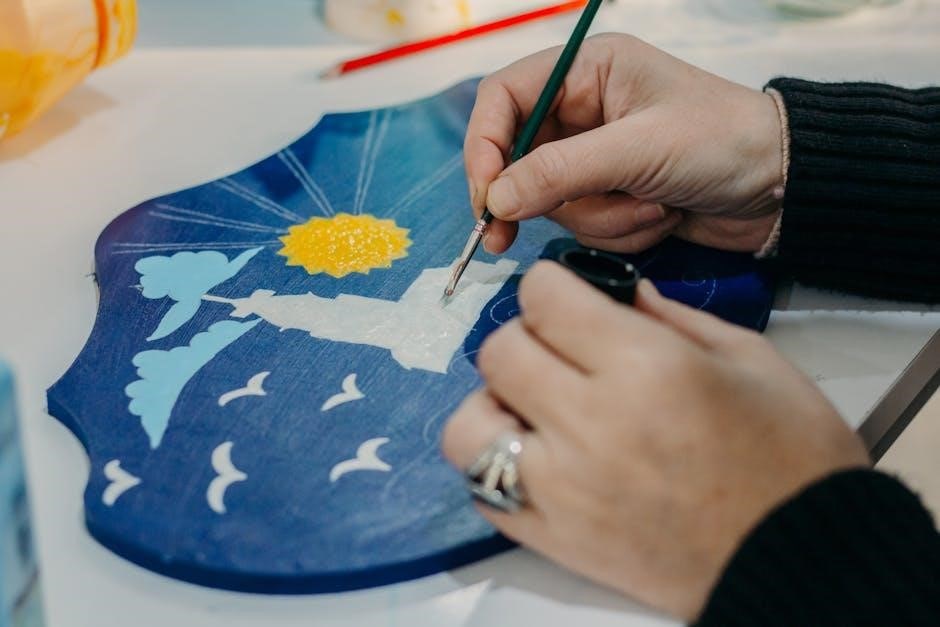
The Painting Process
Dip your brush into edible paint or royal icing, then gently apply it to the cookie. Layer colors for intricate designs, making each cookie uniquely creative and personalized.