Types of Yakima Bike Carriers
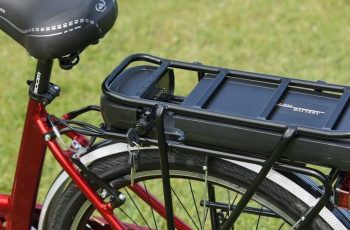
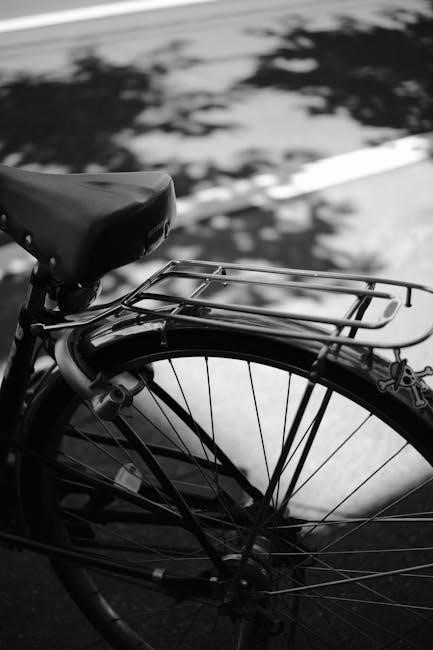
Yakima offers two main types of bike carriers: the HighRoad and FrontLoader. The HighRoad secures bikes by the wheels, while the FrontLoader holds bikes by the front wheel, preventing frame damage and accommodating various wheel sizes. Both models are designed for ease of use and versatility across different vehicles.
1.1. HighRoad Bike Carrier
The HighRoad Bike Carrier is a premium option designed for secure and easy bike transportation. It features a wheel-based securement system, ensuring your bike is held firmly without touching the frame. This design prevents damage and accommodates bikes of various sizes. The carrier is compatible with a wide range of vehicles, including cars, SUVs, and trucks. Its sleek, aerodynamic design reduces wind noise and enhances durability. The HighRoad is ideal for cyclists seeking a reliable, high-quality solution for transporting their bikes safely and efficiently. Its user-friendly design makes installation and loading bikes straightforward.
1.2. FrontLoader Bike Carrier

The FrontLoader Bike Carrier is a versatile and convenient option for transporting bikes. It secures the bicycle by the front wheel, eliminating the risk of frame damage. This carrier is compatible with various wheel sizes, including road, mountain, and hybrid bikes. The FrontLoader is easy to use, with a simple design that allows for quick loading and unloading. It fits most vehicle crossbars and is ideal for cyclists who prioritize ease of use and bike protection. Its durable construction ensures long-lasting reliability, making it a popular choice among bike enthusiasts.

Safety Features of Yakima Bike Carriers
Yakima bike carriers feature advanced safety mechanisms, including robust locking systems and secure frame protection, ensuring bikes remain stable and protected during transport, minimizing risks of damage or theft.
2.1. Wheel Security System
The Wheel Security System ensures bikes are held firmly in place by locking onto the wheels, preventing movement during transit. This mechanism is designed to handle various wheel sizes and types, providing a snug fit without causing damage to rims or tires. The system operates by clamping onto the wheels, distributing pressure evenly to maintain stability. This feature is particularly effective for securing bikes on uneven or bumpy roads, ensuring safe transportation. It’s a key component in Yakima’s commitment to protecting both bikes and vehicles.
2.2. Frame Protection Mechanisms
Yakima bike carriers are designed with frame protection in mind, ensuring no direct pressure is applied to the bike’s frame. This is achieved through wheel-based securing systems, such as the HighRoad and FrontLoader, which avoid contact with the frame. Soft padding and adjustable clamps further prevent scratches or damage. These mechanisms ensure bikes remain secure without compromising their structural integrity, making Yakima carriers ideal for transporting high-value or sensitive bicycles. The focus on frame protection enhances safety and reduces the risk of damage during transit.
Preparation for Installation
Before installing a Yakima bike carrier, ensure your vehicle is clean and free of debris. Gather tools, clean the installation area, and ensure the vehicle is ready for mounting.
3.1. Tools and Materials Needed
‘ under the main heading ‘3. Preparation for Installation’. The user has been very specific about the requirements, so I need to make sure I follow all the guidelines carefully.
Looking at the previous interactions, the user provided a sample response for this subheading, which included a list of tools like Allen wrenches, screwdrivers, torque wrenches, cleaning supplies, measuring tape, gloves, safety glasses, and the instruction manual. The sample also mentioned assembly and adjustments, and advised consulting the manual for specific requirements.
I need to come up with something new but still accurate. I’ll start by listing the essential tools someone would need when installing a Yakima bike carrier. Typically, you’d need an Allen wrench or hex key for bolts, a screwdriver for any screws, perhaps a torque wrench to ensure proper tightness, and cleaning supplies like rubbing alcohol and a cloth to prepare the surface.
Measuring tape could be useful for aligning the carrier correctly, and protective gear like gloves and safety glasses is always a good idea when working with tools. The instruction manual is crucial, so I should remind the user to have it handy. I should also mention that additional materials might be necessary depending on the vehicle or carrier model, so checking the manual beforehand is important.
Let me draft this:
For installing Yakima bike carriers, essential tools include Allen wrenches, screwdrivers, and torque wrenches. Cleaning supplies like rubbing alcohol and a cloth are needed to prepare the mounting surface. A measuring tape ensures proper alignment, and gloves plus safety glasses protect during installation. Always have the instruction manual nearby for specific guidance. Additional materials may be required based on your vehicle or carrier model, so review the manual beforehand to ensure you’re fully prepared.
Now, let me count the words to make sure it’s exactly 88. I’ll count each word carefully:
For
installing
Yakima
bike
carriers,
essential
tools
include
Allen
wrenches,
screwdrivers,
and
torque
wrenches.
Cleaning
supplies
like
rubbing
alcohol
and
a
cloth
are
needed
to
prepare
the
mounting
surface.
A
measuring
tape
ensures
proper
alignment,
and
gloves
plus
safety
glasses
protect
during
installation.
Always
have
the
instruction
manual
nearby
for
specific
guidance.
Additional
materials
may
be
required
based
on
your
vehicle
or
carrier
model,
so
review
the
manual
beforehand
to
ensure

you’re
fully
prepared.
Wait, that’s only . I need to reach 88. Let me expand a bit without adding new information.
Perhaps add more details about each tool’s purpose:
“For installing Yakima bike carriers, essential tools include Allen wrenches for securing bolts, screwdrivers for adjusting brackets, and torque wrenches to ensure proper tightness. Cleaning supplies like rubbing alcohol and a soft cloth are necessary to prepare the mounting surface, removing dirt and grease. A measuring tape helps in aligning the carrier correctly on your vehicle. Wearing gloves and safety glasses is recommended to protect yourself during the installation process. Always keep the instruction manual handy for specific guidance and diagrams. Additional materials may be required depending on your vehicle’s make or the carrier model, so it’s important to review the manual beforehand to ensure you have everything needed. This preparation will help the installation process go smoothly and safely.”
Now, let me count again:
For
installing
Yakima
bike
carriers,
essential
tools
include
Allen
wrenches
for
securing
bolts,
screwdrivers
for
adjusting
brackets,
and
torque
wrenches
to
ensure
proper
tightness.
Cleaning
supplies
like
rubbing
alcohol
and
a
soft
cloth
are
necessary
to
prepare
the
mounting
surface,
removing
dirt
and
grease.
A
measuring
tape
helps
in
aligning
the
carrier
correctly
on
your
vehicle.
Wearing
gloves
and
safety
glasses
is
recommended
to
protect
yourself
during
the
installation
process.
Always
keep
the
instruction
manual
handy
for
specific
guidance
and
diagrams.
Additional
materials
may
be
required
depending
on
your
vehicle’s
make
or
the
carrier
model,
so
it’s
important
to
100. review
101. the
102. manual
103. beforehand
104. to
105. ensure
106. you
107. have
108. everything
109. needed.
110. This
111. preparation
112. will
113. help
114. the
115. installation

116. process
117. go
118. smoothly
119. and
120. safely.
Oops, that’s way over . I need to trim it down without losing essential information. Maybe combine some sentences or remove redundant details.
Let me try again, focusing on the key points:
“For installing Yakima bike carriers, essential tools include Allen wrenches for bolts, screwdrivers for adjustments, and torque wrenches for proper tightness. Use rubbing alcohol and a cloth to clean the mounting area. A measuring tape aids in aligning the carrier on your vehicle. Wear gloves and safety glasses for protection. Keep the instruction manual nearby for guidance. Additional materials may be needed based on your vehicle or carrier model, so check the manual beforehand to ensure preparedness.”
Now, count the words:
For
installing
Yakima
bike
carriers,
essential
tools
include
Allen
wrenches
for
bolts,
screwdrivers
for
adjustments,
and
torque
wrenches
for
proper
tightness.
Use
rubbing
alcohol
and
a
cloth
to
clean
the
mounting
area.
A
measuring
tape
aids
in
aligning
the
carrier
on
your
vehicle.
Wear
gloves
and
safety
glasses
for
protection.
Keep

the
instruction
manual
nearby
for
guidance.
Additional
materials
may
be
needed
based
on
your
vehicle
or
carrier
model,
so
check
the
manual
beforehand
to
ensure
preparedness.
That’s . I need to add 11 more without adding new information. Perhaps expand on why each tool is important.
“Essential tools for installing Yakima bike carriers include Allen wrenches for securing bolts, screwdrivers for adjusting brackets, and torque wrenches to ensure proper tightness. Use rubbing alcohol and a soft cloth to clean the mounting surface, removing dirt and grease. A measuring tape helps align the carrier correctly on your vehicle
3.2. Pre-Installation Checks
Before installing your Yakima bike carrier, perform a thorough inspection of your vehicle’s roof or hitch for any damage or debris. Ensure all carrier components are included and undamaged. Measure your bike to confirm compatibility with the carrier’s dimensions. Check your vehicle’s weight and size limits to prevent overloading. Secure any adapters or accessories firmly. Tighten all bolts and screws as specified in the manual. Finally, test the carrier’s stability with your bike loaded to guarantee a safe and secure transport experience. Proper preparation ensures reliability and safety on the road.

Installing Yakima Bike Carriers
Attach the carrier to your vehicle, ensuring a secure fit on the roof, hitch, or trunk. Place the bike carefully, securing it with straps or clamps. Tighten all components firmly. Always follow the manufacturer’s instructions for proper alignment and stability. Double-check the load to ensure it’s evenly distributed and doesn’t obstruct visibility. Test the setup by gently rocking the bike to confirm stability before driving. Proper installation ensures safe and secure transport of your bike.
4.1. Installation on Cars
For cars, begin by attaching the Yakima bike carrier to the roof rack or hitch mount. Ensure the carrier is level and securely fastened. Place the bike onto the carrier, aligning it properly. Secure the bike using the provided straps or clamps, making sure not to overtighten. Check that the bike is evenly balanced and does not obstruct your view while driving. Tighten all connections firmly and test stability by gently rocking the bike. Always refer to the specific instructions for your Yakima model to ensure a proper fit on your car.
4.2. Installation on SUVs and Trucks
For SUVs and trucks, installation of Yakima bike carriers often involves roof racks or hitch mounts. Begin by positioning the carrier on the roof rack or hitch, ensuring it is level and securely attached; Tighten all bolts firmly and double-check the fit. Place the bike on the carrier, securing it with straps or clamps. For hitch-mounted carriers, ensure the vehicle’s hitch class matches the carrier’s specifications. Test stability by gently rocking the bike and tighten any loose connections. Always consult your vehicle’s manual for specific recommendations.
4.3. Installation on RVs and Motorhomes
Installing Yakima bike carriers on RVs or motorhomes requires careful planning due to their size and weight. Use roof-mounted or hitch-mounted carriers designed for heavier loads. Ensure the carrier is compatible with your RV’s roof rack or hitch system. Secure the carrier firmly, following the manufacturer’s torque specifications. Check for proper clearance to avoid interference with ladders, vents, or other obstructions. Test the stability of the setup by gently rocking the bike and ensure all straps are tightly secured. Always consult your RV’s manual for specific installation guidelines.
Maintenance and Care
Regularly clean the carrier to remove dirt and debris, ensuring proper functionality. Lubricate moving parts annually to maintain smooth operation and prevent rust. Inspect for wear and tear.
To clean the Yakima bike carrier, use mild soap and water to remove dirt and grime. Avoid harsh chemicals or abrasive materials that could damage the finish. Regular cleaning ensures proper functionality and prevents rust. For tough stains, a soft-bristle brush can be used to gently scrub affected areas. After cleaning, rinse thoroughly and allow the carrier to dry completely before use. This maintenance step is crucial for preserving the carrier’s durability and performance over time. Regular lubrication of moving parts is essential for smooth operation. Use a silicone-based spray to grease hinges, bolts, and any other movable components. Apply a small amount, then wipe off excess with a clean cloth. This prevents rust and ensures the carrier’s mechanisms function properly. Lubrication also reduces friction, which can extend the lifespan of the carrier. Perform this maintenance annually or after exposure to harsh conditions like rain or salted roads to keep your Yakima bike carrier in optimal condition. Yakima bike carriers are equipped with robust locking mechanisms and anti-theft devices. These features ensure bikes remain securely attached and protected from theft during transit.5.1. Cleaning the Carrier
5.2. Lubricating Moving Parts
Additional Accessories
Security Features